Can't Do Wheel Pose Yet? What to Practise First
At the end of an online lesson, I asked my student: try wheel for me. Let's see how far you have come.
She lay on her back, placed her hands beside her ears and lifted her hips. When it came to pushing her head and shoulders off the floor, she stopped.
That attempt wasn't about getting up no matter what. I only needed to know where she stopped. Where you stop is where you keep practising.
Try to guess what she was missing.
Guess before you read on
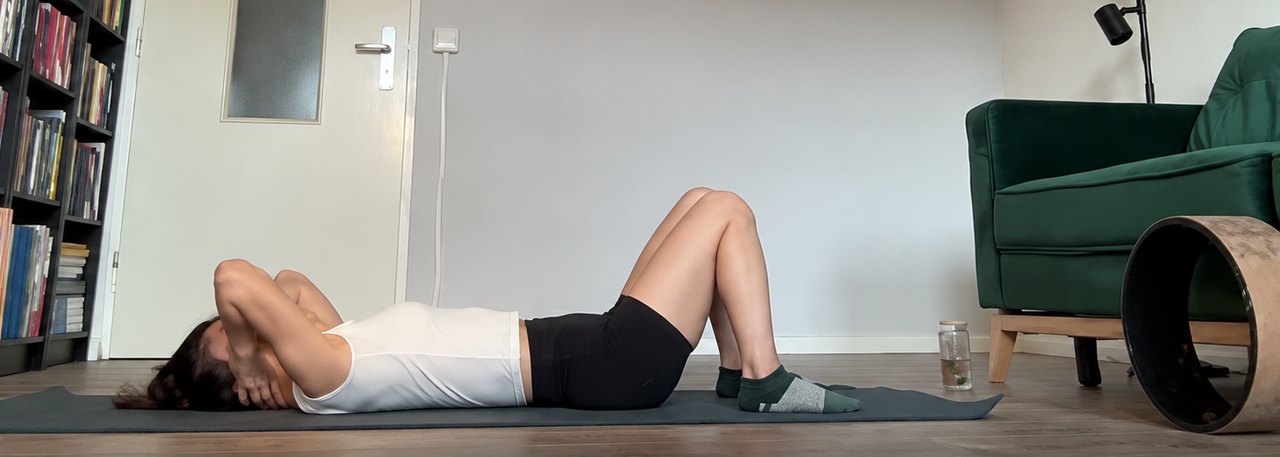
She stopped when she had to push her head and shoulders up. What do you think was missing?
Not quite. She could lift her hips, just like the bridge she had practised earlier in the lesson. She stopped at the moment her arms had to push her shoulders up.
Right. I told her: your armpits and shoulders are still very tight. Open the armpits first, then build arm strength, and then you can push up.
Not quite. Normal breathing is fine. Your breath can't push your shoulders up. Your arms and shoulders do that.
Wheel is not one pose. It is a few parts put together.
Bridge · Setu Bandhasana
Shoulders on the floor. Arms resting.
Legs and hips do the main work.
Wheel · Urdhva Dhanurasana
Shoulders off the floor. Hands press and push up.
Adds arms, armpits and shoulders to the bridge.
The yellow dot is the shoulders. Bridge: shoulders on the floor. Wheel: your arms have to push your shoulders up. The lower half is the same.
Reading this to practise? Go to bridge and the arms and shoulders. Training to teach? There is a 30-second cue card at the end.
In short
- Practise bridge first. Bridge is the lower half of wheel. If you can lift slowly and evenly, your legs are ready.
- Stiff back in camel? Tuck your toes. Your hands reach your heels more easily.
- Wheel also needs arms and shoulders. My student could lift her hips but couldn't push up with her arms, so I gave her armpit opening with a yoga wheel prop and plank for arm strength.
- Can't do wheel yet? Don't force it. Practise the missing part on its own. Stop if you feel pain, numbness or dizziness.
In this article
- Why learn poses in groups, step by step?
- Bridge pose: up one vertebra at a time, down one at a time
- Camel pose: toes tucked or tops of the feet flat?
- Three things people often get wrong
- Wheel pose: practise the part that is missing
- When should you ease off or stop?
- A 30-second cue card for trainee teachers
- Questions people often ask
Why learn poses in groups, step by step?
In that lesson she was learning the backbend group: cobra, upward-facing dog, bridge and camel. Wheel came last, because it is the hardest.
I told her: practise one group of poses for about two or three lessons until you know it. Know the names, know how to come in. Only then move on to the next group. Finish one part before you start the next.
What you learn, you keep. Later, when you teach, you don't have to learn it all again.
Bridge pose: up one vertebra at a time, down one at a time
Before she lifted, I had her check three things.
- Heels close to your bottom. Reach your arms down: if your middle finger touches your heel, that is about right.
- Feet parallel. Don't let your toes turn out.
- Knees and feet hip-width apart. No wider.
Then press your palms into the mat. Breathe in and lift your spine one vertebra at a time: first the sacrum (the flat bone at the back of your pelvis), then the lower back, then middle back. Slowly, like slow motion.
Coming down is the reverse: lower from the upper back down, as slowly as you came up.
I told her: when you teach, teach it the same way.
- HeelsClose to your bottom. Lying down with arms reaching, your middle finger touches your heel.
- FeetParallel. Toes don't turn out.
- KneesHip-width apart, no wider.
- Shoulders and armsOn the mat. Palms press down.
- SpineLifts from the sacrum, one vertebra at a time. Comes down from the upper back.
“I can't feel my vertebrae stacking up.”Good question
She told me this honestly. I changed one word: not stacking up, but lifting one by one.
To feel each vertebra, you have to come up very slowly. And to come up slowly, your thigh muscles must be strong and work hard. When the thighs aren't used to it, people come up fast to make it less tiring. That is normal. Just keep practising, slowly.
Bridge is the lower half of wheel. To get into wheel, your legs need strength first. The arms and shoulders come after.
Camel pose: toes tucked or tops of the feet flat?
Camel pose (Ustrasana): kneel, push your hips forward, then lean back. This is what I asked her to remember, so she can tell her own students later:
Back still stiff
Tuck your toes. Your heels are higher, so your hands reach them more easily.
Back more open
Tops of the feet flat. Only once you can go deeper.
Three places to look in camel
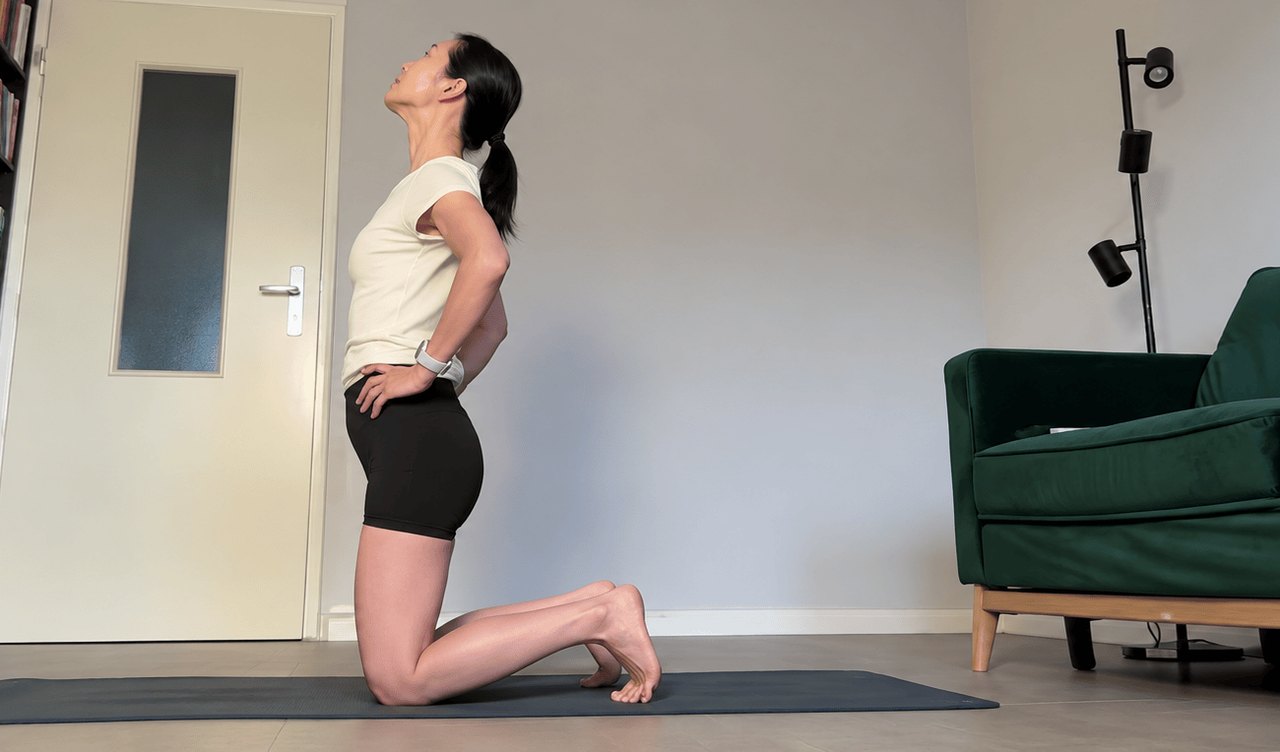
- ToesTucked while your back is still stiff. Press your feet firmly into the mat.
- HipsPush forward. The knees are your main support.
- ChestOpens and lifts towards the sky before you lean back. Keep the neck long and let the head follow the chest. Don't throw it back.
How I led her in:
- Kneel on the mat. If your back is stiff, tuck your toes.
- Breathe in, reach both arms up. Lengthen your spine.
- One hand at a time first. Left hand to left heel.
- Push your hips forward, open your chest, lean back. Keep your neck long. Don't throw your head back.
- Bring your palm down onto your heel. Change sides.
She tried both hands straight away, then said: I can't hold it with both hands. So I took her back to one hand. One hand first, to feel it properly.
After a while she got tired. Tired knees, tired thighs, even a tired chest. I gave her a short rest before we went on.
Three things people often get wrong
She asked me the first one right when she was tired.
Sounds right, but it isn't
1. “I'm tired because I'm breathing wrong.”No
She asked: how should I breathe so it's less tiring? I said: you are breathing normally. You are tired because your muscles aren't used to this intensity yet. It takes some time of practice before the body adapts.
2. “Come up fast so it's less tiring.”The opposite
A fast bridge usually means the thighs aren't strong enough yet to come up slowly. The goal is still slowly up, slowly down. If you can't go slowly today, go a little slower than yesterday.
3. “If I keep trying wheel, one day I'll get up.”Not always
Trying the whole pose again and again leaves the missing part still missing. Look at where you stop, then practise that part on its own. I write more about this in not flexible enough for yoga?
Wheel pose: practise the part that is missing
Back to that last attempt in the lesson. Before she lifted, I spent quite a while adjusting her hands:
- Lie on your back, bend your knees. Bring your heels close to your bottom for strength.
- Bring your hands up towards your ears, elbows pointing up, palms flat on the floor beside your ears.
- Fingers point towards your shoulders. Thumbs on the inside, little fingers on the outside.
- Hands a little away from your head, about shoulder-width apart, no wider.
- Lift your hips as in bridge, one vertebra at a time.
Turning her fingers towards her shoulders took her several tries. I told her: your arms are weak and your armpits aren't open yet. When it is time to push your shoulders up, your arms can't do it.
So it became clear what she already had and what she didn't:
Already there
Legs and hips. She can lift as in bridge.
Needs more practice
Open armpits and shoulders. Practise with a yoga wheel prop.
Arm strength. Practise plank.
Opening the armpits with a yoga wheel prop
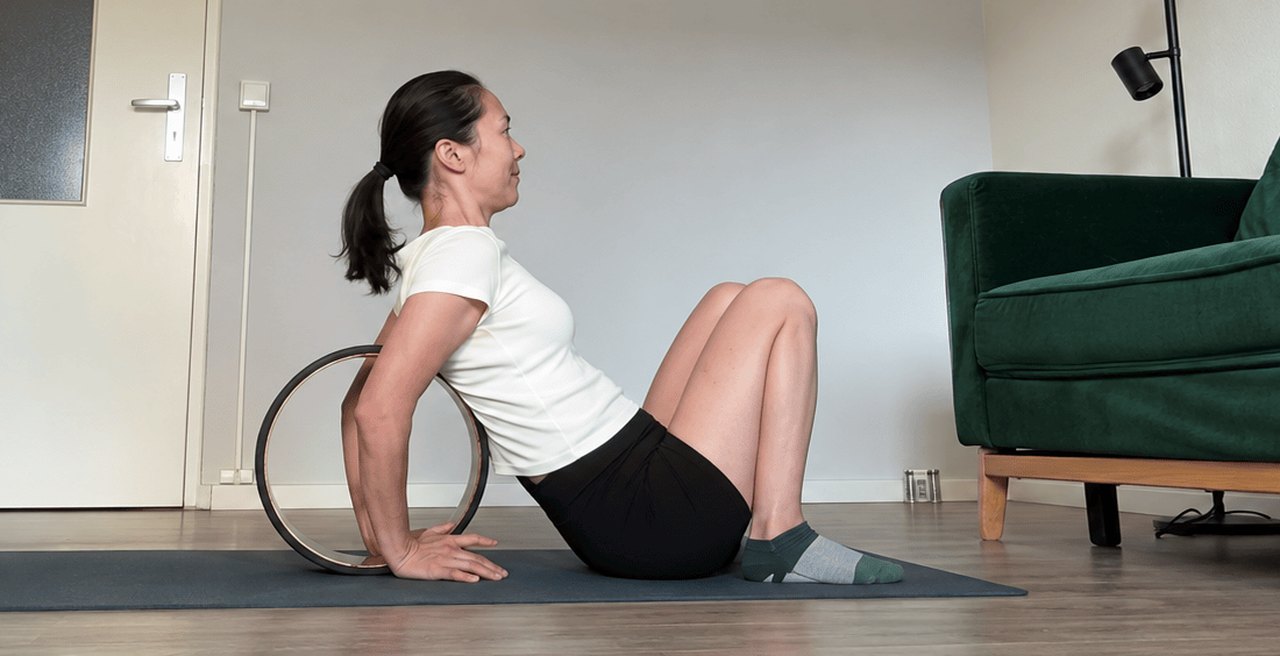
She already had a yoga wheel at home: the round prop, not the pose. I had her sit with her back against it, leaning on it.
- Raise both arms straight above your head, lift your hips a little, lean back.
- Bend your elbows and reach back to hold the top edge of the wheel above your head.
- Bring both elbows in close to your head. Your armpits will stretch.
- Breathe out, lower your hips a little at a time. As you breathe in, keep your hips at that height.
- When you clearly feel the stretch, pause there. Take a few long breaths, then lower a bit more.
Afterwards, she lay down to breathe. I told her: what you just did also opens the upper back. Your upper back is stiff, which is why fish pose didn't work for you earlier.
Plank for arm strength
I asked how long she could usually hold plank. She had never timed it. So we timed it there and then: try one minute.
Halfway through, I reminded her: pelvis to neutral, your bottom is sticking up, bring it down. With ten seconds to go, I let her stop. That was good enough.
She asked how to practise so her body would become more open. I said: practise regularly for about a month, 30 days, then look again. Everyone is different, so I don't promise a date for wheel. I only set the next lesson.
When should you ease off or stop?
She was tired everywhere. I told her: tired muscles are normal. Just go slowly, within what you can do. But there are times to ease off, and times to stop.
Ease off
You are shaking, or you have to hold your breath or tense your neck to stay up. Do camel with one hand, or just kneel and open the chest. Lift lower in bridge. Lie down and rest.
Stop
Pain in your back, neck, shoulders, knees or wrists; numbness or pain that spreads; dizziness. Don't wait for sharp pain. If the pain doesn't go away or keeps coming back, see a doctor.
Ask a professional first
Long-term back pain, a spine, shoulder or wrist condition, pregnancy, or recent surgery. I can't diagnose anything through an article.
Wheel puts a lot of load on the wrists, shoulders and back. Having a teacher watch is better than practising alone.
A 30-second cue card for trainee teachers
Your students will very likely ask the same things she asked: I can't feel my vertebrae, I can't hold it with both hands, how should I breathe so it's less tiring. Screenshot this card if it helps:
Bridge
1. Heels close to the bottom, middle finger touches the heel.
2. Feet parallel, knees hip-width apart.
3. Press the palms into the mat.
4. Breathe in, lift one vertebra at a time, starting from the sacrum.
5. Come down slowly, from the upper back.
Camel
1. Stiff back: toes tucked. More open back: tops of the feet flat.
2. Breathe in, reach both arms up.
3. One hand to the same-side heel first.
4. Hips forward, chest open, lean back. Neck long.
5. Breathe normally. Tired: rest.
In my 200-hour online yoga teacher training, I teach each group of poses like this: practise until you know it, understand why, then practise leading it for someone else. After you graduate, you still have to stand in front of a class and meet bodies that are not like yours.
Questions people often ask
What is the difference between bridge pose and wheel pose?
Bridge: your shoulders, head and arms stay on the floor, and your legs and hips lift your body. Wheel: you also place your hands beside your ears and push your head and shoulders off the floor. Bridge is the lower part of wheel.
How do you do camel pose with a stiff back?
Tuck your toes so your heels are higher and your hands reach them more easily. Do one hand at a time first. Once your back is more open, put the tops of your feet flat.
Is feeling tired in camel a sign of wrong breathing?
Usually it is because your muscles aren't used to the intensity yet. Breathe normally, don't hold your breath. If you are tired, rest a moment, then carry on.
How long does it take to do wheel pose?
I can't promise a time. I ask students to practise regularly for about 30 days, then look again at which part has improved. Everyone is different.
Last words
That day, the wheel attempt didn't go up. But it showed that her legs were ready, and her arms and shoulders still needed work.
Know what is missing, and you know what to practise.
One step at a time.
Read more
- Not flexible enough for yoga?
- Cobra vs upward-facing dog: how do you tell them apart?
- Locust vs bow pose: what's the difference?
- How to cue yoga poses so beginners can follow

Giang Hoang
Yoga teacher, E-RYT 500 & YACEP (Yoga Alliance)
Giang Metta Academy: RYS 200 & RYS 500 (YA ID 442630)
Based in Da Lat, Vietnam. Teaching online worldwide.