How to Observe and Adjust a Student's Yoga Pose
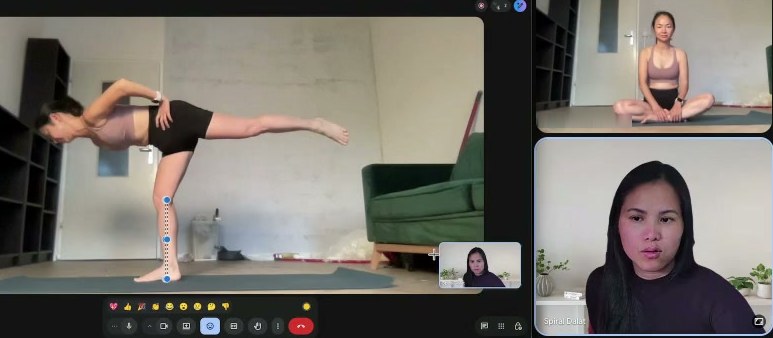
Near the end of a lesson, I shared a photo of my student's chair pose on the screen. This time, the first question came from her: is my knee going a bit too far forward?
That is exactly the kind of question I hope to hear from someone training to teach.
About an hour earlier, on the same screen, I had shown her photo of downward-facing dog and asked: if this were your student, what would you adjust? She didn't know where to start. I had to guide her one part at a time.
An hour later, she was looking on her own and asking her own question.
I'm not calling it magic, and one lesson is not enough. I just want to share the order we looked at the photos in, what we said, and what we chose to change. If you are training to teach yoga and every pose photo looks like "something isn't quite right" but you don't know where to begin, this article is for you.
In short
- When I observe a yoga pose, I start where the body touches the floor and work upwards. It's my checking habit so I don't miss things, not a formula to prevent injury.
- Say what already works, not only what's wrong.
- Choose one thing to adjust at a time. Change one place and another may change with it.
- A photo only shows the outside. To know what the student feels, ask.
- Compare the two sides of the same person, but don't diagnose from a photo.
- When the student says it's too much, stop. You already have enough photos to keep learning.
In this article
- 1. Looking at a pose: where do you start?
- 2. Five principles: questions to ask, or rules to force?
- 3. Why say what already works?
- 4. Many things to fix: which one do you choose?
- 5. What a photo tells you, and what it doesn't
- 6. "Can the knee go past the toes?" How do you answer?
- 7. When the two sides differ, how do you talk about it?
- 8. When the student says "it's too much", what do I do?
- 9. How to practise observing with a photo
- 10. When you learn to teach, how is observing practised?
- What does the research say?
- Questions people often ask
- Last words
- Read more
- References
1. Looking at a pose: where do you start?
Try it now, before you read on
A student is in tabletop: both hands and both knees on the floor. If you were the teacher, where would you look first?
The back: eyes often jump there first, because a sagging or rounded back is easy to see. I suggest another route: start where the body touches the floor, then work up to the back.
Head and neck: easy to see, but they come at the end of the chain. I start where the body touches the floor, then move up.
The hands on the floor: that's where I start too. In tabletop, the palms are the first contact with the floor. From there, move up to the wrists, elbows and shoulders.
Not sure: very normal when you're new. This section gives your eyes a route: the floor first, then upwards.
There's no right or wrong answer. This is my checking habit, not the only way.
While she was in tabletop, I asked: which part should be at a right angle? She said: the arms.
I asked more: at a right angle how, is it square yet, are the joints stacked? Then I suggested she change how she looks: don't jump straight to the part that looks odd. Start where the body touches the ground, and move up.
The tabletop photo: four places we looked
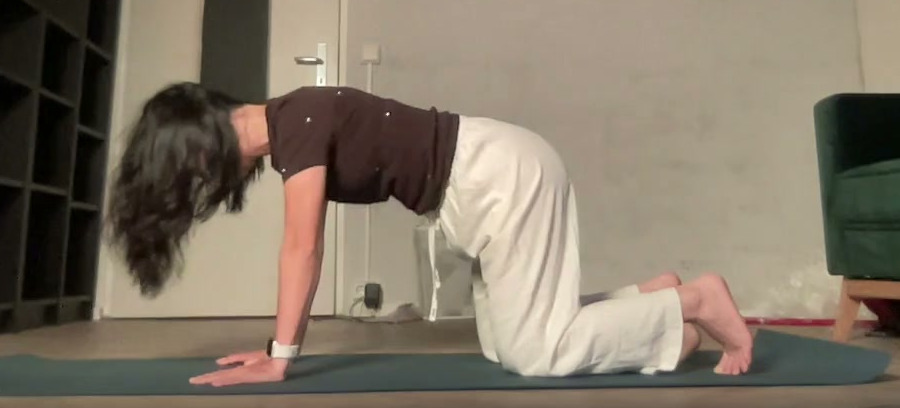
- Palms on the floorFour points: near the base of the index finger, near the base of the little finger, and two on the fleshy pads near the wrist.
- Wrist, elbow, shoulderAre the three joints stacked into one column?
- ThighAlready at a right angle. This part works, so keep it when you adjust something else (section 4).
- FootIs the ankle flexed or pointed? In this photo it's halfway (section 4).
Start at the floor and work up. When something already works, say so, so your adjustment doesn't pull it away.
In tabletop, the first contact with the ground is the palm. She remembered there were four contact points, but wasn't sure exactly where, so she asked again.
I asked her to hold up her palm, and I showed her again: two points near the index and little fingers, two near the wrist, on the fleshy pads. If you forget, open your course notes again. Being reminded doesn't mean you haven't learned. It's the moment memory connects with the feeling in your own hand.
Once the contact points were clear, I asked about the second principle: stacking joints, from wrist to elbow to shoulder. Then I asked about the third, so she would remember it herself, instead of me reading out all five in one go.
This order has a very ordinary reason: the contact with the floor is the easiest part to see, and it supports everything else. Starting there gives your eyes a route, so they don't jump around. But it's my checking habit, not a method proven to prevent injury.
2. Five principles: questions to ask, or rules to force?
I teach alignment with five principles. You can read each one in detail in what alignment in yoga means.
When I observe, I don't use them as five things to force into every pose. Each principle becomes a question.
Five questions when you look at a pose
- Contact with the groundWhere does this pose touch the floor? Is the contact even?Always ask
- Joints stackedAre there joints that need to stack on top of each other?Check if the pose needs it
- Soft jointsWhich joints should be slightly soft? Is any joint locked?Always ask
- Right anglesDoes any part need to be at 90 degrees? In downward-facing dog that day, I didn't look for a part at a right angle to the mat.Check if the pose needs it
- Natural spineIs the spine in the natural shape for this pose? Straight in an extension, curved in camel, rounded in cat.Always ask
If a pose doesn't have one of these elements, don't adjust for it just to tick a box.
3. Why say what already works?
Before we took the downward-facing dog photo, I told her one thing: when you look at a photo, you have to name what's right as well as what's wrong. Where it's right, and by which principle you learned.
I said that because people training to teach easily turn observing into hunting for mistakes. You can find a few mistakes in any photo. But if you only see mistakes, you won't know what to keep when you adjust. And the student in front of you will only hear that they're doing it wrong.
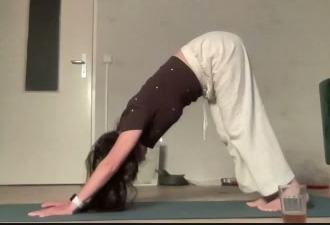
With the downward dog photo, we went part by part. The palms and feet were on the mat fairly well. She saw that her head, neck and gaze were generally fine, and her back was quite straight. I added a note about the long diagonal line of the whole body.
Only then did I ask about the elbows and knees: are they slightly soft, or locked?
The way I saw it that day, the pose was quite straight and nice. That's my judgement of one photo, in one lesson. It doesn't make that pose a model for everyone.
4. Many things to fix: which one do you choose?
Back to the tabletop photo. I saw that her hands were still pressing a bit into the wrists.
Example: weight in the wrists. Which adjustment?
What I want: the weight spread over the four points of the palm, not sinking into the wrist.
Option 1: bring the hands closer to the kneesNot chosen
The way I read it, the thigh that's at a right angle would get pulled out of place: hands and knees too close, hips easily drifting back.
Option 2: keep thighs and hands, move the shoulders slightly forwardChosen
What already works stays. Then I asked her: do you feel the weight in your palms now?
The body is one connected piece. Change one place and another may change too, so look at what's working before you give the cue.
A biomechanics study of triangle pose shows something similar: with a wider stance, the load on the front leg went up and the back leg went down. Change one thing, and the two legs aren't loaded the same. That study doesn't define one safe shape for everyone.1
Right after that, I asked her to look again: what else needs fixing? She noticed her foot wasn't at a right angle, and came up with two options herself: lower the foot, or lift the heel. I really valued that moment. She didn't just see it. She already had a way to adjust it.
I only helped with the names:
- Heel up, toes pressing down: flexing the ankle more.
- Top of the foot down on the floor: pointing the ankle.
Her foot was halfway at that point, neither flexed nor pointed. If you want a student to do what you mean, say clearly: flex or point.
5. What a photo tells you, and what it doesn't
A photo lets you stop movement and look. But a photo has limits.
In the front-view photo of tree pose, she noticed herself that her standing foot was rolling out a little. I agreed. Then I added: to know whether the standing knee is soft or locked, I need to see the knee clearly.
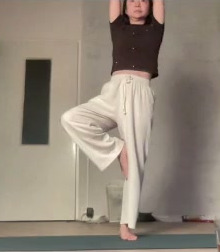
When I asked what else she saw, she didn't notice anything else. I pointed out that her belly was pushing slightly forward, and she agreed. Not seeing everything is normal. Your eyes need practice too, just like your body.
What a photo shows, and what it doesn't
A photo shows
- The outside shape at one moment: contact with the floor, the joints, the back, the neck, the gaze.
- Only what the camera angle can see.
A photo doesn't show
- Whether the student feels strain or ease, pain or no pain. You have to ask, like I asked her: do you feel the weight in your palms, do you feel it sinking into your feet?
- Anything hidden. Take another angle or ask the student. Don't guess.
- Whether the student has fixed it. Photos from a different round or angle aren't a "before" and "after".
The outside shape and the inside feeling have to go together.
6. "Can the knee go past the toes?" How do you answer?
Back to her question at the start of this article.
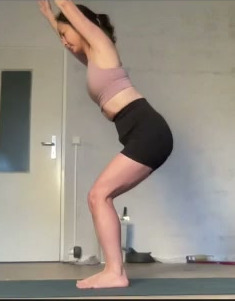
My answer: with the way I was guiding that round, the knee could line up with the toes. Her knee wasn't even at her toes yet, so it could come forward more. The marker I set for that round was not past the toes.
Notice the words "for that round". It's a marker I chose for one person, one pose, one goal. Not a rule for every knee.
Then we looked at the back. I used the hem of her top as a reference: from there down, fine. Above it, she could draw the chest in slightly so the upper back rounds just a tiny bit.
But I also said clearly: I already accept the current level. That adjustment is for doing even better, not because it's wrong now. For beginners, telling "already fine, can be refined" apart from "wrong" matters a lot. It decides how the student feels when they leave the class.
7. When the two sides differ, how do you talk about it?
In Warrior 3, I reminded her to read the photo as if she were observing another student, from the floor up.
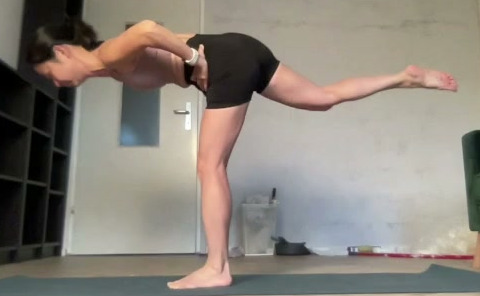
On the first side, the standing knee was bent quite deeply to keep balance. In that situation, I saw it as normal. She noticed herself that her head was lifting a little. I agreed, and said her back was fine. What I wanted her to notice was that her neck was still gripping. In a hard pose, I hope to still see some calm.
On the other side, the way I saw it, the standing leg was less steady, the leg didn't dare to straighten, and the neck was still reaching.
Here you need to be careful. Two sides being different is very common. What I said was only true for her, on that day. I don't turn it into a rule that one leg is always weaker. In research on strength differences between legs, how it's measured and what counts as "abnormal" vary from study to study, and the link with injury isn't consistent.2 One photo is even less enough to conclude which side is weak, whether the pelvis is uneven, or anything else is wrong.
Comparing sides helps me choose the next question: does this side need more time, a different way in, or should I ask the student what they feel? If new pain appears or discomfort lasts, that's for a health professional, not for a photo.
8. When the student says "it's too much", what do I do?
After downward dog, I suggested trying to move into pyramid pose for another photo. She followed for a bit, then said she had reached her limit, it was really tight.
I said that's fine. Take your time, stay calm. We already had two photos to analyse. No need to do it again at all costs.
It's a small thing, but I want new teachers to remember it: a nice photo is not worth a student going past their limit. When a student tells you how they feel, they're helping you. Let them see that saying it was the right thing.
It was her first lesson, and she hadn't practised for a long time, so I didn't give her a heavy practice. Going hard straight away often means sore muscles the next day, and then you can't keep practising.
One more thing if you teach in person: if you want to touch someone to adjust them, say clearly where you'll touch and why, and ask first. Silence is not consent. Saying yes last time doesn't mean yes every time.3 Online, I can't touch, so I adjust with words, photos and questions, and the student adjusts themselves.
9. How to practise observing with a photo
You can practise now with a photo of your own pose, or one of a friend who has agreed to be photographed and reviewed.
- Photograph a familiar poseChoose a pose you learned with a teacher. Shoot from the side so you can see hands, feet and knees. If something is hidden, take another angle.
- Read from the floor upHow are the hands and feet touching the floor? Then move up: which joints stack, which are soft, what the spine is doing, where the neck and gaze are.
- Write two things that workSay which principle they fit.
- Choose one thing to changeOnly one. Before choosing, check what else might be pulled along if you change it.
- Ask how it feelsIf it's someone else's photo, ask how the pose felt. If it's yours, remember what you felt while practising.
- Say it as one cueName which part, what to do, and which direction. I write about practising the words in how to cue yoga poses.
- Try again and look againIs the next round different? How does the student feel?
Don't use this exercise to guess pain, guess illness or fix injuries. If there's pain, stop, and ask someone qualified.
10. When you learn to teach, how is observing practised?
In the first lessons, I repeat information a lot. Someone who has just learned something can't remember it straight away. But in later lessons, I ask questions so the learner answers on their own. If I keep reminding, the learner gets used to waiting for reminders and doesn't learn to analyse.
Someone who just practises may only need to hear the cue. Someone who will teach is different: they need to know what they are adjusting, and why.
In my 200-hour online yoga teacher training, besides 80 hours of live guidance with me on Zoom, there are 60 hours of teaching practice. You invite the people you teach; I watch you teach live on Zoom and give feedback, so you practise seeing and adjusting real bodies.
A certificate of completion and registering as an RYT 200 with Yoga Alliance are two different things. More in online yoga teacher training and Yoga Alliance.
What does the research say?
Three studies on observing and feedback
None of the studies below are about yoga, or about a specific order of observing.
2017 · People with different experience watch the same PE class video
More experienced people noticed and interpreted different things. This suggests "knowing how to look" grows with experience. The study only compared groups; it didn't follow how one learner improves.4
2022 · Review: video feedback in school PE
Results were generally positive, sometimes better than verbal feedback alone. But that's video, not still photos, and school students, not adults learning yoga online.5
2022 · Meta-analysis: frequent feedback or less?
No clear advantage was found for reducing feedback. So "choose one thing at a time" in this article is my practical way to see change, not a law.6
Questions people often ask
Should you fix every mistake at once?
No. Choose one thing, see how the student responds, then move on. The exception is anything affecting safety right now: say it straight away.
Can the knee go past the toes?
I don't have one answer for everyone. In the chair pose round in this article, I set the marker at not past the toes for my student, based on the goal of that round. Another pose, another person, another goal may need a different marker.
Teaching online, you can't touch. Can you still adjust poses?
Yes, but differently: with words, photos and questions. The student adjusts and feels it themselves. The whole lesson in this article was online.
Photos or video for feedback?
A photo lets you stop and look at position. Video also keeps how the student moves into and out of the pose. Either way, the person being recorded needs to agree, and you should say what the images are for.
Is it useful to look at photos of my own poses?
Yes, if you look to understand your body, not to force yourself to look like a model photo. When you're not sure, ask your teacher to look with you.
Last words
In that lesson, most of what was worth saying, she saw herself. The foot not at a right angle, with two ways to fix it. The standing foot rolling out. The head lifting in Warrior 3. And the question about her knee, before I even asked. When it got too tight, she said so too, and we stopped there.
I only gave her an order to look in, and asked again and again. The rest was her own eyes.
A good teacher isn't the one who spots the most mistakes. It's the one who knows what to keep, what to change, and how to let the student see it for themselves.
Start at the floor.
Read more
- How to cue yoga poses so beginners can follow
- Sun Salutation for beginners: what if your breath can't keep up?
- What is alignment in yoga?
References
The order of observation in this article is my own teaching habit. The sources below are for further reading on biomechanics, observation and feedback in movement teaching.
-
Baum BS, Hooker K, Vital O, Rinsem V, Rankin M, Coombs J (2022). Varying alignment affects lower extremity joint and limb loading during yoga's triangle (Trikonasana) pose. Journal of Bodywork and Movement Therapies, 30, 60–68. DOI: 10.1016/j.jbmt.2022.02.008. 18 yoga practitioners in triangle pose; it doesn't prove any pose is safe or causes injury. ↩
-
Parkinson AO, Apps CL, Morris JG, Barnett CT, Lewis MGC (2021). The Calculation, Thresholds and Reporting of Inter-Limb Strength Asymmetry: A Systematic Review. Journal of Sports Science and Medicine, 20(4), 594–617. DOI: 10.52082/jssm.2021.594. A review of strength, not of yoga pose photos. ↩
-
Yoga Alliance. Code of Conduct, principle 7 on consent to touch and consent to recording. Official page. A professional ethics standard, not safety research. ↩
-
Reuker S (2017). The noticing of physical education teachers: a comparison of groups with different expertise. Physical Education and Sport Pedagogy, 22(2), 150–170. DOI: 10.1080/17408989.2016.1157574. ↩
-
Mödinger M, Woll A, Wagner I (2022). Video-based visual feedback to enhance motor learning in physical education—a systematic review. German Journal of Exercise and Sport Research, 52(3), 447–460. DOI: 10.1007/s12662-021-00782-y. 11 studies in school physical education. ↩
-
McKay B, Hussien J, Vinh MA, Mir-Orefice A, Brooks H, Ste-Marie DM (2022). Meta-analysis of the reduced relative feedback frequency effect on motor learning and performance. Psychology of Sport and Exercise, 61, 102165. DOI: 10.1016/j.psychsport.2022.102165. Feedback after each attempt; it doesn't cover every kind of live instruction. ↩

Giang Hoang
Yoga teacher, E-RYT 500 & YACEP (Yoga Alliance)
Giang Metta Academy: RYS 200 & RYS 500 (YA ID 442630)
Based in Da Lat, Vietnam. Teaching online worldwide.