What Is Alignment in Yoga? Five Principles for Standing Steady
Once, in the middle of an alignment lesson, I said: if you practise with good alignment, you won't get injured.
Then I had to correct myself straight away.
Nobody can promise "won't". The honest word is reduce. Good alignment reduces the risk of injury. If I still need to correct my words after all these years of teaching, then a beginner who needs to correct how they stand is perfectly normal.
This article is for you if you are new to yoga, and for you if you are training to teach. I want you to understand why teachers give alignment cues, not only remember where to put your hands and feet.
In this article
- What is alignment?
- Five principles: an anchor, not a mould
- 1. Ground contact: start from the feet
- 2. Joints stacked over joints: ankle, knee, hip
- 3. Soft joints: not locked tight
- 4. 90 degrees: compared with the ground
- 5. A natural spine: not a ruler
- Putting it together: Mountain Pose
- Functional alignment and aesthetic alignment
- Alignment, where you look, and breath
- "I feel straight. Why are you still correcting me?"
- A one-minute check
- When you are learning to teach
- What is science, and what is teaching method?
- Questions beginners often ask
- Last words
In short
- Alignment is how you arrange bones, joints and muscles as you enter, hold and leave a pose.
- It has two aims: to reduce the risk of injury and to help each pose do more for you. Reduce, not remove.
- I teach standing poses with five principles: ground contact, joints stacked over joints, soft joints, 90 degrees to the ground, and a natural spine.
- The five principles are an anchor, not a mould. A pose that doesn't look like the photo is not automatically wrong.
- Alignment works together with where you look (drishti) and how you breathe.
- Holding your breath to keep a shape is a signal to change how you practise, not to try harder.
What is alignment?
Alignment is how you arrange your bones, joints and muscles as you come into a pose, stay in it and come out of it. Some people simply call it good form.
Put simply: where your feet are, which way your knees point, how your trunk is supported, whether your head moves with your body.
Alignment helps you know where you are placing your body. Without it, you may move into a pose without noticing where your feet and body end up.
There are two aims: to reduce the risk of injury and to help each pose give you more. Reduce, not guarantee. Yoga, like any kind of movement, can still hurt if you push too far.1
Try it while you read: if you are sitting, put both feet flat on the floor, comfortably. Which part do you feel most: your heel, the pad under your big toe, or the pad under your little toe?
Don't fix anything yet. Just notice where you are resting. That is the first step of alignment.
Five principles: an anchor, not a mould
I teach alignment in standing poses with five principles:
- Ground contact.
- Joints stacked over joints.
- Soft joints.
- 90 degrees to the ground.
- A natural spine.
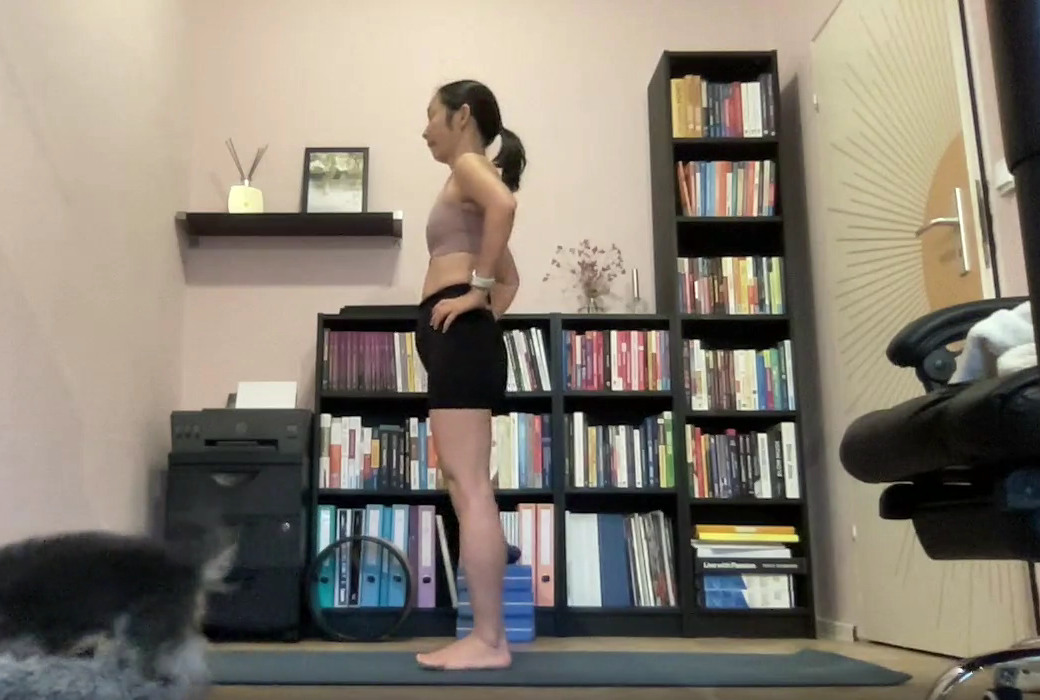
It sounds like a score sheet. It isn't.
The five principles are an anchor, something to hold on to, so you know where you are and where you are heading. Nobody gets all five right in the first lesson. If you could do them all perfectly, you wouldn't need to come to class.
The goal is strong enough and flexible enough. Strong enough to hold your body. Flexible enough to open into the pose. Whichever side is missing, you train it slowly.
1. Ground contact: start from the feet
Before I look at the knees, I look at the feet.
If the base is shaky, fixing the shoulders or the head won't keep you steady for long. In physics, the area inside your points of contact is called the base of support. Two feet on the floor give you a wide base. On one leg the base is small, so balance is harder.2
In standing poses, I ask students to notice three areas on the sole of each foot:
- The heel.
- The pad under the big toe.
- The pad under the little toe.
These three areas give your attention somewhere to go. Instead of hearing "stand firmly" and not knowing what to do, you can feel where you are resting.
You don't need the weight perfectly even. Knowing that you lean towards your heels or towards your toes already gives you something to practise.
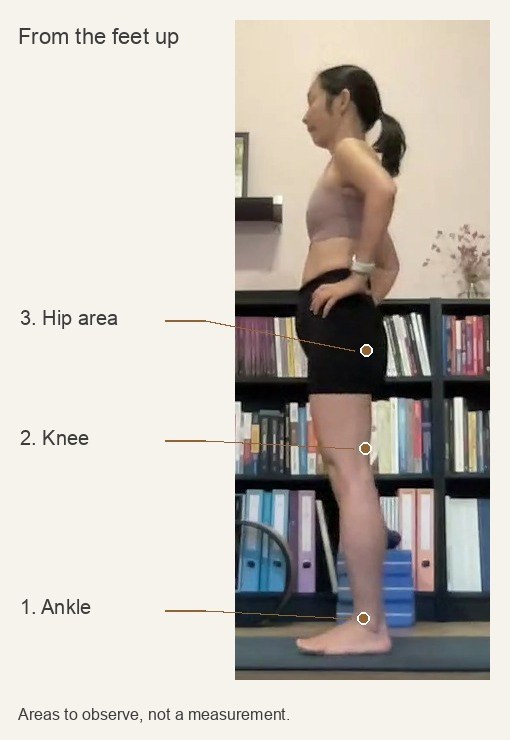
2. Joints stacked over joints: ankle, knee, hip
From the base of the feet, I look up: ankle, then knee, then hip.
When the joints stack over each other, roughly, your weight travels through the bones and the muscles don't have to carry everything. A study that measured forces in older adults also found that each standing pose puts different demands on the hips, knees and ankles.3 Place yourself a little differently, and your body works differently.
The important word is roughly. In the first lessons, I don't ask for "100% stacked". A body is a living thing, not a column holding up a house.
3. Soft joints: not locked tight
Soft is the opposite of locked tight.
In standing poses, the cue is very specific: keep a slight softness in the knee of the standing leg. When the knee isn't pushed all the way back, the thigh and calf muscles have to help hold you up. You are standing with working muscles, not hanging on your joints.
Once in class, a student moved her hips back and then noticed her knees had pushed back again. Exactly. Adjust one place and another place changes. We went back to the knees, softened them a tiny bit, and only then moved on.
You can read that moment in three steps:
- Observe: look from the feet up and see the knee pushed all the way back.
- Adjust one point: keep the feet where they are, and only soften the knee a little. Don't sink.
- Look at the whole body again: how did the hips and back change? Is the breath still easy?
Not everyone needs to move their hips back. The useful part is the order: see, adjust one place, then look at the whole body again.
Soft does not mean being afraid to straighten. Straightening the knee is a normal movement.4 What I want to avoid is pushing the knee back as far as it goes and leaning on it. Many classes call this locking the knee.
If your joints are very flexible and your knees easily go past straight, pay more attention here. For joint hypermobility syndrome, the NHS advises: don't overextend your joints just because you can.5 Flexible doesn't mean you have to use your full range.
Just a little. Not standing with bent knees all class.
4. 90 degrees: compared with the ground
In class I ask: 90 degrees compared with what?
With the ground. The surface of your mat.
In a lunge, the front shin is like a pillar standing on the base of the foot, with the knee over the ankle. In a standing pose, it is the feeling of your body standing up from the ground.
Don't confuse this with bending your knee to a right angle. Those are two different angles.
If your knee can't bend deeply yet, don't bend it deeply yet. Stand a bit higher, bend a bit less, and the front shin can still stand upright over the foot.
Ninety degrees is a reference for looking and analysing. It is not an order for every body. Some days, some bodies need to stand a little differently. That's fine.
5. A natural spine: not a ruler
Seen from the side, the spine has gentle curves at the neck, the upper back, the lower back and the sacrum.6
In class I used to call it an "S-shaped spine". Then I realised it still wasn't accurate. The curves are gentle. They don't bend clearly like the letter S.
So "standing straight" doesn't mean pressing your back flat like a ruler. I want you to feel your body lengthen upward while keeping its natural curves. No squeezing your belly and holding your breath just to look straighter.
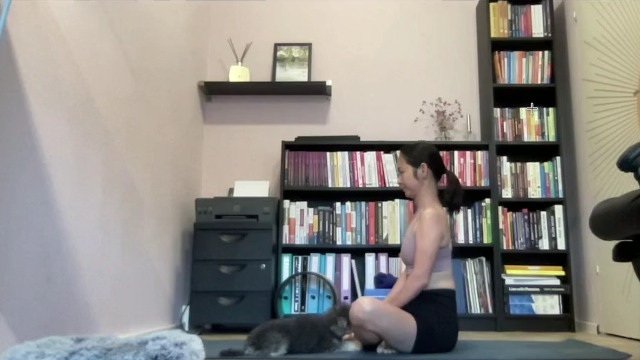
One more thing: looking at someone's posture is not enough to say why their back hurts. Research so far has not agreed that posture causes back pain.7 A teacher observes in order to guide. A teacher's eyes do not replace a medical examination.
Putting it together: Mountain Pose
Mountain Pose (Tadasana in Sanskrit) is the simplest standing pose. It looks like just standing still. But all five principles are there.
- Ground contact: feet parallel. The three areas under each foot share the weight, roughly. No single area carries too much.
- Stacked joints: from the side, ankle, knee and hip stack over each other, roughly.
- Soft joints: the knees are not pushed all the way back.
- 90 degrees: the body stands up from the ground, not falling forward, not leaning back.
- Natural spine: the body lengthens upward, the gentle curves stay, the neck moves with the back.
There is no single right distance between the feet. Some teachers ask for big toes touching and heels slightly apart. Others ask for feet hip-width apart.8 In my classes I usually suggest about a fist's width. If balance is hard for you, stand a little wider. A wider base makes standing easier.
Try turning your toes out, then bring them back to parallel. Notice your thighs. When the feet change direction, the whole leg above turns with them. That is why I start from the feet.
A student once told me she had to remember to "move my pelvis back", because she had stood the old way for so long. I changed the words: bring the pelvis back to balance is closer. Not pulling it back forever. Finding the balance point from where your body is now.
I also don't tell students to squeeze their belly. Squeezing the belly very easily comes with holding the breath. When the pelvis finds its balance, I let the belly draw in gently on its own, and the breath can still move.
There is one more force that is always there: gravity. Let the ground hold your feet. Your body actively lengthens upward. In class, I call this lifting against gravity an inner counter-force: gravity pulls down, you lift yourself up. Enough lift, no gripping.
Functional alignment and aesthetic alignment
In class, I put two pictures side by side.
One is the pose "just like the photo". I call this aesthetic alignment, or perfect alignment: beautiful in form.
The other is a body in practice, not yet like the photo. That is functional alignment: working with what your body can do and how it is built today.
If the support in your back, belly or legs is not enough today, don't pull your body into the photo. The way is to adjust a little at a time, without rushing, so your body has time to adapt.
But a shape that differs from the photo is not enough to say someone is weak. Sometimes it is how the body is built. Sometimes it is just today.
I remind students that a yoga teacher is not an orthopaedic surgeon. I don't set bones, put on casts or insert screws. I support a body to change over a long process. Wanting a nice shape is not a reason to force the body today.
These two are also not two fixed groups of people. People who have practised for years, teachers included, have tired days when they can't do what they usually do. Today you are close to the photo. Another day you adjust the pose to what your body can manage. Both are practice.
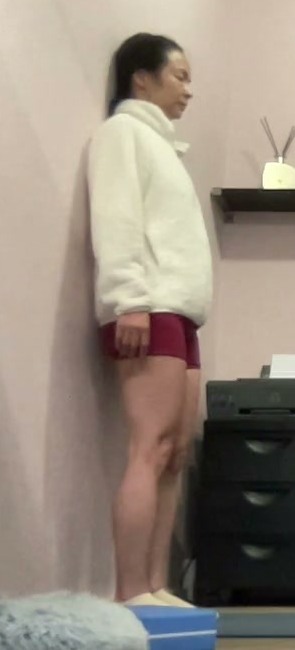
One more thing. In a lesson, I look at every detail. Outside the lesson, you don't need to grade your posture all day. Adjusting and readjusting for perfect alignment takes a lot of energy, and it is hard to keep. Know which way you usually drift. When you remember, adjust gently. That is enough.
Every body is also different, even the two sides of the same person.9 So in the same pose, each person will look a little different. That is normal.
Alignment, where you look, and breath
In every pose, I guide three things together: alignment, where you look, and breath.
Take tree pose as an example.
Someone who isn't steady yet needs a way to practise without worrying about falling all the time: the foot lower on the leg, a hand on the wall. Someone who is already steady still has something to learn: am I holding my breath? Am I gripping my whole body?
Drishti is a point for your eyes to come back to. When your eyes wander, your attention wanders too, and balance gets harder. Your eyes are also one of the sources of information for balance. One study found that only changing the distance to the thing you look at changes how much the body sways.10 Choose a comfortable point and look softly. No need to strain your eyes.
Breath is what people forget most when they try to hold a shape. If you push so hard that you hold your breath, you have lost part of yoga. Holding a shape without breathing can also make you uncomfortable or give you a headache.
Besides the eyes, the body has an inner sense of position, called proprioception: knowing where your arms and legs are without looking.11 Practising alignment is also practising listening to this sense.
"I feel straight. Why are you still correcting me?"
In an online one-to-one lesson, a student felt she was sitting well. I asked her to stay in that position so we could take a photo, and then we looked at it together.
Her back had moved back, but her neck had slid forward. Maybe when the back moves back you feel unsteady, so the neck moves forward to keep you balanced. She didn't notice it while practising. The photo showed it.
I don't use photos to deny what a student feels. A photo gives teacher and student one place to look together. Only the person practising can say whether she is gripping, whether something feels uncomfortable, how her breath is.
The way to learn here is: feel → look together → adjust one point → feel again. Not trying to match a photo at any cost.
She also said she had to grip and hold her breath to stay there. I didn't tell her to try harder. I had her lean her back against the wall and sit and breathe for a while. Then I asked again. Then she felt lighter.
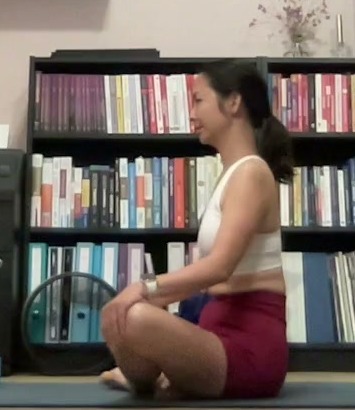
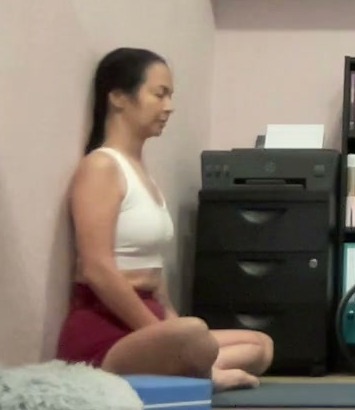
For someone else, the support might be different. What doesn't change: gripping and holding your breath are signals to change how you practise, not to try harder.
If this happens to you, tell your teacher clearly where it feels strange or hard to hold. Don't hide what you feel just to do what the teacher said.
A one-minute check
You don't need to fix your whole body. Just look and feel.
- Stand on a flat floor, feet a comfortable distance apart. Stand near a wall or a sturdy chair in case you need to hold on.
- Feel the three areas of your feet: heel, pad under the big toe, pad under the little toe. Where are you leaning?
- Notice your knees: are they pushed all the way back? Soften them a tiny bit and see if your thighs work more.
- Notice your back: is it pressed flat, or arched a lot? Let your body lengthen upward and keep its natural curves.
- Look at one point in front of you and notice that you are breathing.
If you feel pain, dizziness or unwell, stop. If you have a health condition or have been told to limit exercise, ask your doctor first.12
Today, you only need to notice one habit. That's enough.
When you are learning to teach
Knowing the five principles is half of it. The other half is knowing what to adjust first and what to adjust later.
In standing poses, I start from the feet, then move up to the knees, hips and back. Fixing shoulders before the base is steady is working backwards. And after each adjustment, I give the student time to feel it before I say the next thing.
In the same online one-to-one lessons I mentioned above, when we practised kneeling upright, the student couldn't yet see how two adjustments were different. I put the two photos side by side. Together we saw that her lower back looked less arched in one of them.
But I said clearly: we have only worked on the part from the knees up to the thighs and the lower back. The shoulders and head still need a look. One area changing does not mean the whole pose is done. If I only said "good", she would find it hard to know what had just changed and what she was still learning.
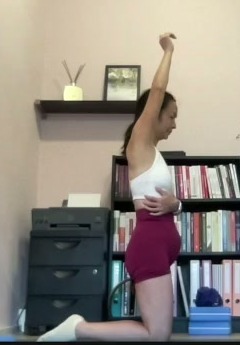
Sometimes a student finds the position while practising, then goes back to the old habit. I ask questions so she notices where her body is. Doing it while the teacher is cueing and finding it again on your own are two different skills.
When a student doesn't understand, I don't repeat the same sentence louder. I change the approach: try a different sensation, like lifting the toes a little to feel the front of the foot; put two photos side by side; or open a picture of the spine and then come back to the student's own body. Each person understands through a different door.
The hard part of the job is the eye and the questions. It doesn't come from memorising pose names.
The homework I give students training to teach: watch how the runners around you stand. Who arches, who rounds, who stands to one side. Don't correct anyone yet. First, learn to see.
I'll also be honest: some students still struggle after many adjustments. Other people's bodies are not like yours. You understand this only by teaching a lot.
That is why supervised teaching practice with feedback is a large part of my 200-hour online teacher training.
What I value in this student
The student in those two online lessons asked very precise questions.
What about someone whose pelvis tilts to one side, not forward or back? Is the wrist in the picture really at the hip joint? When I asked her to touch her thigh bone, she asked back: the thigh is down there, so where exactly do I touch?
They sound like small questions. But a teacher needs exactly that habit: if a landmark isn't clear, ask. Don't guess.
Looking at the first photo of her standing, she noticed on her own that her knees still pushed back a little, then that her neck seemed to move forward. I only added: look from the bottom up, start at the feet.
When we practised walking, she walked once with her feet turned out, the way she usually did, then once with her feet parallel. She described the difference herself: walking with straight feet felt easy, more in line.
Ask clearly. Look at your own photo. Say honestly what you feel. None of these needs a flexible body, and they are the foundation of a teacher.
You already have that foundation.
What is science, and what is teaching method?
I want you to finish this article knowing what each idea stands on.
- Supported by science: a wider base makes balance easier; the spine has natural curves; bones differ between people, and even between two sides of one body; the body senses its own position; the eyes help with balance.
- Research has not agreed: whether a particular posture causes back pain. So don't diagnose people by looking at how they stand.
- Teaching method, not a law of nature: the five principles, the 90-degree reference, the split between functional and aesthetic alignment. That is how I organise lessons so beginners have something to hold on to. Other schools may teach it differently.
That is why I always say alignment reduces the risk of injury. I never say it guarantees anything.
Questions beginners often ask
If my alignment is good, will I never get injured?
No. As I corrected myself at the start: alignment reduces risk. It doesn't remove it. Beginners should learn with a qualified teacher. If you have a health problem, talk to your teacher first so you can practise in a way that suits you.1
If my pose doesn't look like the photo, is it wrong?
Not necessarily. Functional alignment means working with what you can do today. Look at whether you are steady, whether you can breathe, whether anything hurts. Not only at how close you are to the photo.
Is it wrong to straighten my knees?
No. Straightening the knee is a normal movement. What to avoid is locking it: pushing the knee back as far as it goes and leaning on it, especially if your joints are very flexible.
Where should I start adjusting?
In standing poses: the feet first. Choose one point each time you practise. You don't need to use all five principles to fix yourself at once.
Last words
Alignment is not for checking all the time where you are crooked.
It is for knowing what you are standing on, where you are heading, and how far you can go today.
Adjust to understand yourself.
References
The five principles and the split between functional and aesthetic alignment are how I organise my teaching. The sources below are for further reading on anatomy, balance and safety.
-
NCCIH/NIH, Yoga: Effectiveness and Safety — the risks of practice and advice to practise with a qualified instructor and adapt to your health needs. Accessed 1 Oct 2026. ↩↩
-
OpenStax, College Physics for AP® Courses, section 9.3, Stability — base of support and the conditions for balance. ↩
-
Wang MY et al. (2013). The biomechanical demands of standing yoga poses in seniors: The Yoga empowers seniors study (YESS). BMC Complementary and Alternative Medicine, 13:8. DOI: 10.1186/1472-6882-13-8. Measured in 20 older adults. ↩
-
OpenStax, Anatomy and Physiology 2e (2022), section 9.5, Types of Body Movements — extension and hyperextension. ↩
-
NHS, Joint hypermobility syndrome — "do not overextend your joints just because you can", advice for people with joint hypermobility syndrome (page reviewed 30 Aug 2023). Accessed 1 Oct 2026. ↩
-
OpenStax, Anatomy and Physiology 2e (2022), section 7.3, The Vertebral Column — the curves of the spine. ↩
-
Swain CTV et al. (2020). No consensus on causality of spine postures or physical exposure and low back pain: A systematic review of systematic reviews. Journal of Biomechanics, 102:109312. DOI: 10.1016/j.jbiomech.2019.08.006. ↩
-
Yoga Journal, Mountain Pose (Tadasana) — big toes touching and heels slightly apart, with a hip-width variation (updated 27 Mar 2025). Accessed 1 Oct 2026. ↩
-
Dimitriou D et al. (2016). Side-to-side variation in normal femoral morphology: 3D CT analysis of 122 femurs. Orthopaedics & Traumatology: Surgery & Research, 102(1):91–97. DOI: 10.1016/j.otsr.2015.11.004. ↩
-
Munafo J, Curry C, Wade MG, Stoffregen TA (2016). Gaze distance and postural sway in standing. Experimental Brain Research, 234:2721–2730. DOI: 10.1007/s00221-016-4676-7. ↩
-
OpenStax, Anatomy and Physiology 2e (2022), section 14.1, Sensory Perception — the sense of body position and movement. ↩
-
NHS, Exercises for sciatica problems, exercise video safety information (updated 2 Mar 2026) — general advice: stop if you feel pain or unwell; get medical help if symptoms don't go away. ↩

Giang Hoang
Yoga teacher, E-RYT 500 & YACEP (Yoga Alliance)
Giang Metta Academy: RYS 200 & RYS 500 (YA ID 442630)
Based in Da Lat, Vietnam. Teaching online worldwide.