How to sequence a yoga class: more than a list of poses
Same six poses · reordered on paper
Level changes: 5 → 3
Draft5 level changes
- 1Triangle
- 2Supine twist
- 3Extended Side Angle
- 4Seated twist
- 5Downward-Facing Dog
- 6Another seated twist
Revised3 level changes
- 1Downward-Facing Dog
- 2Extended Side Angle · both sides
- 3Triangle · both sides
- 4Seated twist · both sides
- 5Another seated twist · both sides
- 6Supine twist · both sides
We had reached the twists in an online lesson. The student had just finished a seated twist on both sides.
I asked them to lie down for a supine twist.
Then I remembered another seated twist I had not taught yet. So I changed the plan: finish the seated poses first, then lie down. No need to lie down only to sit up again.
In the lesson · twists
Just finishedSeated twist, both sides
My first planLie down for a supine twist
Revised planFinish the other seated twist, then lie down
My mouth was one step ahead of my lesson plan.
A small moment. But it points to a skill that new teachers often overlook: a yoga sequence is not a list of pose names. It is the path a real person takes from one position to another.
The red sequence above is an example. On paper, “Triangle → supine twist → Extended Side Angle” is just three names. On the mat, it means standing, lying down, then standing up again. The person practising has to do everything between those arrows, including the parts you did not write down.
This article is for you if you are learning to teach and starting to plan your own sequences. It is not a practice session to follow along with.
At a glance
- Pose names are destinations. Transitions are the route, and the person practising has to travel all of it.
- For each pose, write down three things: where it starts, how to enter it, and how to leave it.
- A pose can have several ways in. Choose one that connects with where the person already is.
- Grouping standing, seated and lying poses can avoid unnecessary changes of level. It is a useful habit, not a rule.
- Keep it manageable. When you are new to teaching, choose fewer, simpler poses and include both sides.
- Change one element at a time when exploring variations, and know what you changed.
In this article
- Poses are destinations; transitions are the route
- Choose what to teach before choosing the poses
- One pose, more than one way in
- A transition is also time to set up again
- Group poses to avoid unnecessary level changes
- Fewer poses, more attention
- Variations: change one element at a time
- Revise a draft sequence
- Try it on paper
- From a lesson plan to a real person
- Common questions
1. Poses are destinations; transitions are the route
Imagine giving directions to someone who does not know the area. You name three places and tell them to go that way.
They will get lost.
A lesson plan with only pose names has the same problem. You know where you want to go. The person practising does not know which foot moves next, which way to face, or where to put their hands.
On the lesson plan
On the mat
The transition
- leave A
- set up
- enter B
+ Change sides for poses practised on each side.
In that lesson, after Extended Side Angle, I asked the student to remember how they had entered it. They would need that when guiding their own students: where to start, how to enter, and how to leave.
- StartWhere is the person just before this pose: standing, sitting, kneeling or lying down?
- EnterFrom there, what needs to change: feet, hands, direction, or body level?
- LeaveWhere do they go as they leave the pose? When do they change sides? Where do they go next?
Every arrow in your lesson plan is a question still to answer.
2. Choose what to teach before choosing the poses
New teachers often askWhich pose should I put here?
I prefer to ask firstWhat will the person learn to do in this part?
Once you can answer that, choosing poses becomes much easier. Many no longer need to be on the list: they do not serve what you are teaching.
Still too broad
Practise five standing poses.
That gives a number, but not a focus.
More specific
Practise entering Extended Side Angle from a wide stance, then returning to the starting position.
Now there is something clear to guide and observe.
That day, I taught three groups of poses.
A map of that lesson
- Side bendsbending the body to one side
- Twistsseated · lying · standingThe opening story happened here
- Joint mobilitya squat and its variations
Each group gives the student something to understand. Instead of remembering unrelated names, they can think: these are twists, with seated, lying and standing versions.
Along with what you want to teach, you need to know what the person has already learned, whether you need to ask your teacher anything first, and how much time you have.
And do not use your own body as the measure. What feels easy to me may not feel easy to someone else.
3. One pose, more than one way in
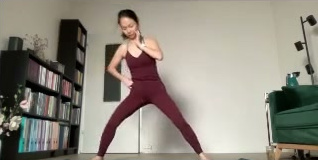
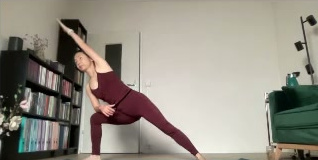
That day, I guided the student into Extended Side Angle in two ways: once from a wide standing position, and once from Downward-Facing Dog.
Same destination. Different preparation, and different words to guide it.
These diagrams compare ways to plan a sequence. They do not give enough detail to practise an unfamiliar transition on your own.
Route 1 · from standing
Route 2 · from Downward-Facing Dog
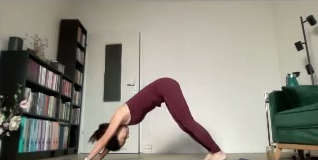
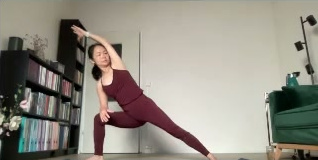
Why learn both routes? My explanation was simple: if we are already in Downward-Facing Dog, we can connect from there. We do not have to return to standing and start again every time.
Next came Triangle. Its starting stance was like the one we had just used for Extended Side Angle: feet apart, one foot turned out and the other turned in. The poses share a base. Put them close together and the person does not have to set up from the beginning again. It also makes the sequence easier to guide.
Triangle can also begin from Downward-Facing Dog. There are many ways into a pose. At first, learn one or two well.
There was something else I kept doing throughout the lesson: practising both sides of each one-sided pose. Mark the change of sides in your plan. It is easy to forget when you are busy thinking about the next pose.
Once you have chosen the route, you need words that the person can follow. I cover that separately in how to cue yoga poses clearly.
4. A transition is also time to set up again
It is easy to stop paying attention between poses: finish this one, move quickly into the next.
Yet this is exactly when a person can lose the position you helped them find.
In the lesson, I brought the student back to Mountain before Twisted Chair. Within a few seconds, I noticed their lower back arching. We adjusted the position of the torso first. Then came the hip hinge, lowering the hips, and only then the twist.
Those extra steps make the sequence longer on paper. But they give the twist that follows a base to work from.
Do not skip the setup.
If the next pose needs a new base—a different stance or foot position—write that setup into your plan. Do not assume the person already knows it.
5. Group poses to avoid unnecessary level changes
Back to the opening story. The student was sitting. I was about to ask them to lie down. There was still another seated pose to teach.
Finish the seated part first, then lie down. Nobody needs to lie down just to sit up again a moment later.

Look at the order on paper
Suppose you have chosen two seated poses and one lying pose, all suitable for the person practising:
Sit → lie → sit2 level changes
- 1Seated A
- 2Lie
- 3Seated B
Sit → sit → lie1 level change
- 1Seated A
- 2Seated B
- 3Lie
The same three poses. The green version removes one return to sitting, provided you have no particular reason to separate the seated poses.
Group poses when it serves the practice, not at any cost.
Sometimes you change position deliberately: to allow rest, to practise a particular transition, or because you notice the person needs a change. Standing, sitting, then standing again is not automatically wrong. Know why you are doing it.
One more point: that day was a lesson on groups of poses, not a complete practice session. After the lying poses, I had the student stand up for Twisted Chair. Do not copy the whole lesson order as a model sequence.
6. Fewer poses, more attention
When we reached joint mobility, I told the student we would add just one more pose that day. Too many would be hard to remember.
That applies to someone learning to teach. It also applies to the people in your class.
A sequence with twelve different poses may look varied. But each pose has a way in, a way out, and a point for changing sides. Keeping up with all your instructions can take so much effort that the person has little attention left for their body.
Count it on paper
12 different poses24 entries and exits
5 poses, learned well10 entries and exits
In the same lesson, I suggested starting with simple poses when you first teach. Many people are much stiffer than I am.
It sounds simple. But a new teacher may choose difficult poses to show how much they know. The person practising needs a sequence they can follow, not proof of how skilful the teacher is.
A good sequence is one the person can follow.
7. Variations: change one element at a time
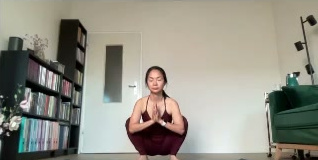
In the squat, the student asked whether to lift their heels.
A good question. I explained that heel position could become a variation later. Today, we were learning the basic squat. Another day, we could change one element, such as lifting the heels. We would still be working on hip mobility, just in a different way.
Then I showed a few more versions. Each was another way to work, with a different level of difficulty:
Basic
- Heels
- Arms
- Legs
Heels lifted
- Heels
- Arms
- Legs
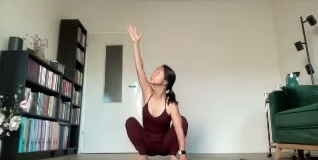
One arm extended, the other reaching up; eyes follow the raised hand
- Heels
- Arms
- Legs
One leg extended to the side
- Heels
- Arms
- Legs
The coloured label shows what changes from the basic squat.
The third card, in class
Changing everything
Change arms, legs, gaze and body level all at once.
The person may not know what to focus on. You may not know which change made it difficult.
Changing with a reason
Keep the base and change one thing, such as arm position.
You know what changed and can observe its effect.
Changing the arms can change the balance demands. Two variations that look similar may not be equally difficult. When you are learning to plan sequences, try changing one element at a time on paper. Ask your teacher to review it before guiding someone else.
I told the student that this early stage was about understanding principles. Once those make sense, there is room to be creative, rather than copying bits from elsewhere or memorising every example.
Have a reason for each variation.
8. Revise a draft sequence
This is a paper exercise to practise thinking through a sequence. It is not a practice session or a lesson plan I used in class. The poses are ones the student had been taught during the lesson.
Look again at the opening chart: the same six poses, reordered to remove two changes of level in this paper example. Here is what changed.
How many gaps can you find?
This is the red draft from the opening chart. There are at least four things to look at. Try finding them before opening each answer.
- Triangle
- Supine twist
- Extended Side Angle
- Seated twist
- Downward-Facing Dog
- Another seated twist
Gap 1Hint: look at body level
From Triangle, the person lies down, then stands up again for Extended Side Angle.
Gap 2Hint: look at the stance
Triangle and Extended Side Angle share a standing base, but the draft places them far apart.
Gap 3Hint: look at the two seated poses
Downward-Facing Dog sits between the two seated twists.
Gap 4Hint: look for “both sides”
There is no note about where to change sides.
Opened /4 answers. No score—just compare with what you noticed.
What does the revision change?
- Downward-Facing Dog comes first, leading into Extended Side Angle as in route 2 in section 3.
- Extended Side Angle and Triangle sit together because they share a base.
- The two seated poses stay together. The lying pose comes last.
- Both sides are marked where needed.
The same six poses. A different route between them.
The revision is still not a complete practice session. Preparation, rest, the transition from standing to sitting, and timing are still missing. But rearranging the poses reduces the level changes on paper from five to three.
9. Try it: write the transition between two poses
On paper—no need to get up and practise
Choose two poses you have learned with a teacher. Fill in the space between them:
- Leave the first pose: which position does the person return to?
- Set up for the next pose: where do the hands, feet or body direction need to change? Is a new standing or seated base needed?
- Change sides and rest: when do they change sides? Where can they pause if they cannot follow yet?
Read it as if you were guiding someone who could not see you. Wherever you wrote only “move into”, add the missing detail or mark it as a question for your teacher.
This exercise checks your planning and writing. It does not establish whether your two chosen poses suit a particular person.
Before you finish the plan, check
These boxes are for your own check on this page. They are not saved.
To see an existing sequence broken down for learning, read Sun Salutation for beginners. Learning a set sequence and planning your own are related, but they are not the same task.
10. A plan on paper is not yet a class
On paper, the arrow between two poses is only a few millimetres long. With a real person in front of you, you may need to wait, explain again, or choose another way in.
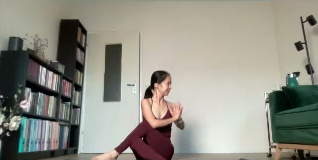
A moment in class
During the seated twist, the student told me they were turning their body.
I looked again. They were, though only a little. I put that down to stiffness in the spine. That was all right.
The plan says “seated twist”. It does not say how far the person in front of you can turn. You find that out by watching and listening.
In lessons, I often remind students to slow down and pay close attention to what they feel in their own bodies. Learning to feel a movement for yourself is part of learning to understand and guide someone else.
In the 200-hour online yoga teacher training, teaching practice involves real people. I observe in person or through Zoom and give feedback. That is where you find out whether your plan works beyond the page, on the mat.
Do not only ask whether you remember all the pose names. Ask whether the person knows what to do next, and whether you can keep observing them as you guide.
For a pose or transition you have not learned, you need direct guidance from a teacher. This article cannot assess a person's health or adjust a movement for them.
Common questions
Must every yoga sequence go from standing to sitting to lying down?
No. That is one way to reduce changes of position, not a rule for every class. The order depends on what you are teaching and who is practising.
How many poses should a sequence include?
There is no right number for every class. When you are new to teaching, a few poses that people can follow while you observe them are more useful than a long list.
Should I include both sides?
In the sessions I guide, we practise both sides of one-sided poses. Mark the change of sides in your plan so you do not forget while teaching.
Can I combine poses I already know?
You can start planning on paper. But knowing individual poses does not mean you know how to connect them or choose them for another person. Practise guiding a short section with a teacher's guidance and feedback.
Is this a 60-minute yoga class plan?
No. This article is about choosing an order and planning transitions. A class also needs timing, an appropriate level, preparation, rest and adjustments for each person.
Start with two poses
No need to plan a long class yet. Choose two poses you have learned, write the route between them carefully, then take it to your teacher.
Remember the transitions.
Read next: How to check understanding in yoga

Giang Hoang
Yoga teacher, E-RYT 500 & YACEP (Yoga Alliance)
Giang Metta Academy: RYS 200 & RYS 500 (YA ID 442630)
Based in Da Lat, Vietnam. Teaching online worldwide.