How to modify a yoga pose without losing the lesson
At the start of an online class, a student was sitting on a block for meditation. Her posture looked good.
I asked whether she felt relaxed. Not yet, she said. The area around her hips was still tense.
I could have told her to relax again. And again. But she was not tense because she had failed to hear me. She was working to hold herself up.
One student, one class
One seat, three adjustments
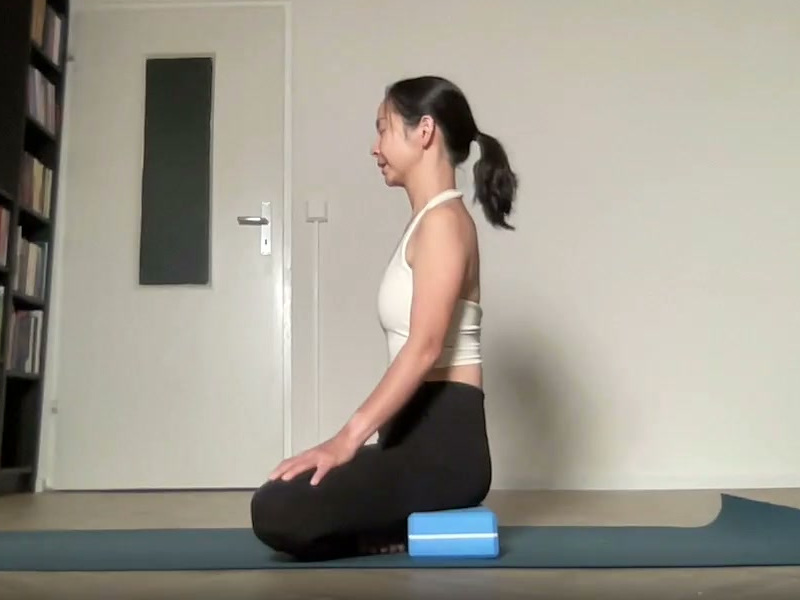
1 · One blockThe posture looked good. Her hips still felt tense. 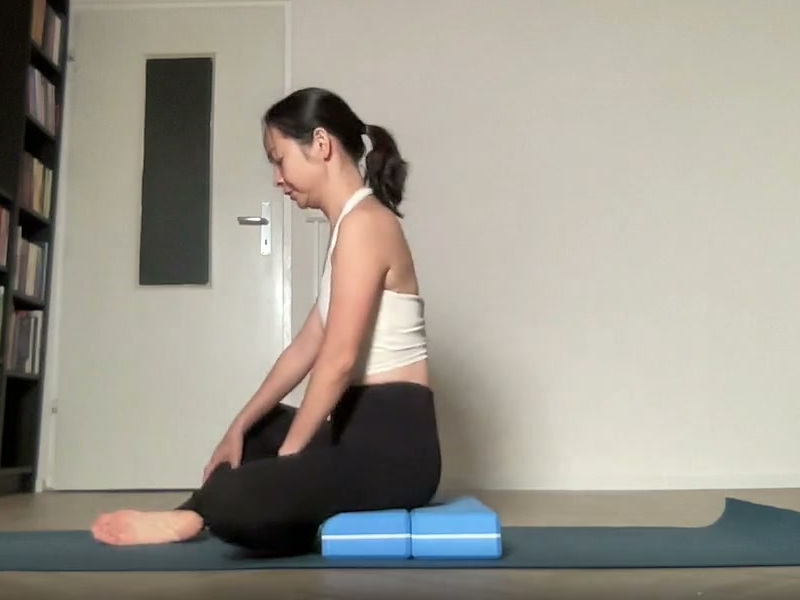
2 · A low, wide seatBlocks placed together to make a seat, like a small chair. 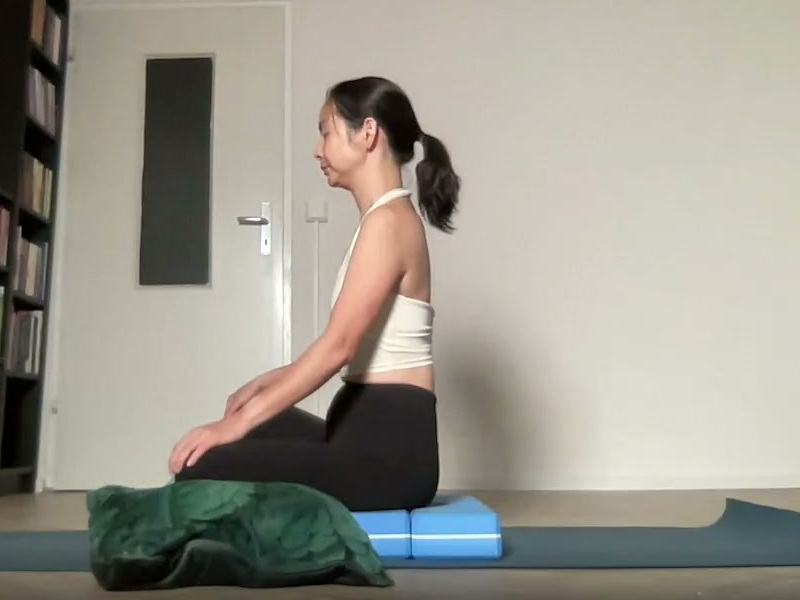
3 · A folded cushionSupport in front of her legs. When I asked again, she said it felt better.
Not another reminder to relax. Change the support, then ask again.
The photos show a different seat. Feeling better was the student's report, not something a photo can prove.
This article is about that moment when a student cannot manage a pose: what can change, and what needs to stay?
In this article
- Repeat the cue, or change the seat?
- How can you make Dolphin less demanding?
- Push-ups: how far down, and what stays?
- What if the wrists cannot take more?
- One class: what changed, what stayed?
- Three questions before you modify
- When should you reduce the effort or stop?
- What changes when you learn to teach?
- Common questions
1. Repeat the cue, or change the seat?
Someone sits on the mat with their knees above their hips and nothing supporting their legs. They use the muscles around their hips and buttocks to hold the position.
You ask them to relax. They release for a few seconds, then tighten again because they feel themselves tipping.
Raise the seat and place a cushion under the legs in front, and the support takes over some of that work. Now the instruction to relax has a practical way to happen.
Later in that class, the student suggested another way to sit. She said it was more comfortable. I did not reject it. I asked whether she felt tension anywhere. She did not. So we used it.
Then she asked whether she was leaning forward a little. I looked: only slightly, and her knees had support. That was fine.
2. How can you make Dolphin less demanding?
Later in the same class, we prepared for Dolphin: forearms on the mat, hips high, legs straight.
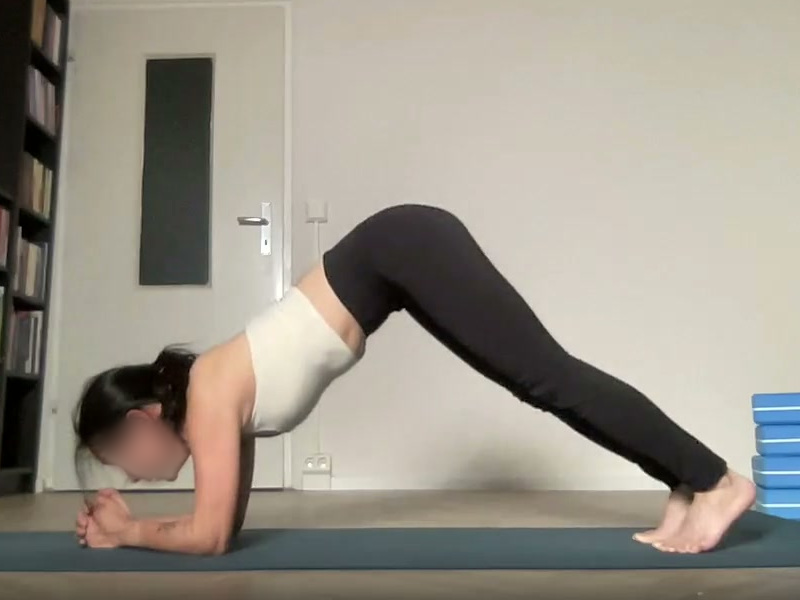
At first, her knees were bent and her shoulders were making small movements. It looked like the pose, but I could not see the work I wanted her to practise.
I asked her not to move the shoulders forward yet. First, work on the legs: lift the heels, straighten the knees and raise the hips.
She did that, and it became much harder. I could see that straightening behind the knees was difficult, that her arms were not yet strong enough for this version, and that her feet were too close to her hands.
Try this before reading on
A student is practising Dolphin. Straight knees and raised heels make it too demanding. As the teacher, what would you change?
Bend the knees: it is easier, but it removes the part we are practising in this exercise. Read on to see what I chose.
Move the feet away: this is what I chose that day. The distance changes; straight knees and raised heels stay.
Leave the exercise: sometimes this is needed, for example if there is pain. If it is only too demanding, though, you may lose the chance to practise this part.
Not sure: that is normal when you are learning. Start by asking what you are teaching in this pose today. That is the part to keep.
No score. This was my choice for one student in one class.
Let the knees bend as they did before.
The focus of this exercise is lost: straight knees, heels up.
Move the feet a little farther away. Keep all ten toes pressing into the mat.
Change the distance. Keep the knees straight and heels up.
I chose B. Once she is stronger, she can bring her feet closer again. I asked whether it felt better. She said it did.
We could change the number of repetitions too. The target that day was 30. Twenty-five or 20 was fine. I wanted the action to be clear before worrying about the number.
3. Push-ups: how far down, and what stays?
Next came push-ups. She placed her palms on blocks and supported herself on her knees. Her hands were wide, near the edges of the mat, to make it easier.
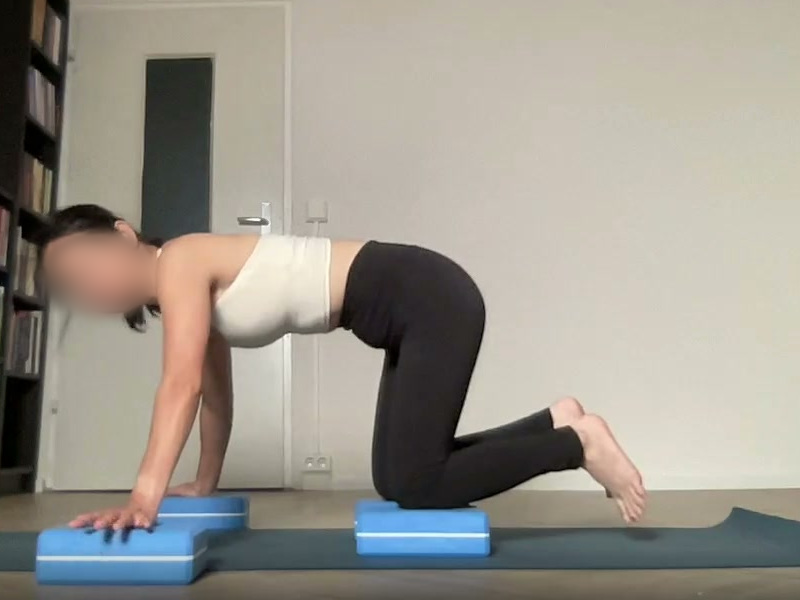
I asked which parts were supporting her. Looking at the screen, was the line from her hips to her knees upright, or were her hips moving back?
I used the image of a house: the supports should be like its pillars. Upright, at right angles to the floor.
Upright supports. Hips not moving back behind the knees.
Hands on blocks, placed wide. Lower just a little, enough to feel the upper arms working.
She asked whether she could let her elbows point outwards. I said that was fine for now, as long as the supports stayed upright. This was new and demanding for her.
After a while, her wrists were very tired. I told her that understanding the alignment came first. Strength would take time.
4. What if the wrists cannot take more?
When we reached Plank, she said her wrists could not take any more.
I changed it to a forearm plank. The target was one minute. While she held it, I kept watching her hips and back, asking her to lift through the lower back and adjust her pelvis.
I counted 30 seconds, 40, then 50. She came down at points.
I am not telling this as a success story. It was a tiring class. She had already done more than twenty rounds of Sun Salutations. I reminded her not to push too hard. Some days are different from others.
The decision matters here: when one point of support cannot manage more, change the support. Her hips and back were still what I was watching.
5. One class: what changed, what stayed?
In that class, I made adjustments in five parts of the practice. None of them removed what we were trying to learn.
Sitting for meditation
ChangeA wider seat of blocks, a cushion under the legs in front
KeepA naturally upright back, without tensing the hips to hold it
Dolphin
ChangeFeet farther away, fewer repetitions
KeepStraight knees, raised heels, toes pressing down
Push-ups
ChangeHands on blocks, wider apart, less depth
KeepUpright supports, hips not moving back
Plank
ChangeFrom palms to forearms
KeepThe focus on hips, back and pelvis
Boat and Warrior III
ChangeBend the knees towards the chest in Boat; hands on hips in Warrior III
KeepThe position of the back comes first
Look at the Change lines. A few things come up again: support, distance, contact point, depth, how far the arms or legs reach, and repetitions.
The Keep lines are about alignment. If you do not yet understand the alignment of a pose, it is hard to know what can change. I explain this separately in what alignment means in yoga.
6. Three questions before you modify
I do not have a fixed formula. Those blocks were for that student on that day. Someone else might need fewer blocks, or a chair.
But I often ask myself three questions:
- What am I teaching in this pose today? That is the part to keep.
- What is making this person tense or work beyond what they can manage? A low seat, feet too close, a painful point of support. That is something to change.
- What does the student say after the change? Better, the same, or uncomfortable somewhere else? The answer helps decide what comes next.
7. When should you reduce the effort or stop?
- Muscle fatigueThis is normal. Take your time and rest when needed.
- Shaking, holding the breath, tensing the neck to stay upReduce the demand. Change one of the things in section 5.
- Pain in the wrists, shoulders, back or knees; numbness; spreading pain; dizzinessStop. Do not wait for sharp pain. If pain persists or keeps returning, seek medical advice.
If you have a medical condition, are pregnant or have recently had surgery, speak to a qualified healthcare professional first. I cannot diagnose you through an article.
I practise to get stronger, not to wear myself out. I am not competing.
8. What changes when you learn to teach?
When you practise, you choose a variation for yourself. When you teach, you choose for another body. That body is not yours.
The difficult part is doing three things together: seeing the focus of the exercise, listening to the student and finding something useful to change. Online, there is no hands-on guidance. You have the screen and your questions.
Sometimes a student may feel disappointed about being given an easier version. You need to explain why the important part of the task is still there.
I used to wobble all over the place in Crow Pose. So I do not assume that someone who cannot manage a pose is lazy.
In the 200H Online Yoga Teacher Training, we work on this in live sessions: you practise guiding, I watch, and we look at what needs adjusting. If you are considering the course, you can read how the teaching practice works, then talk to me about what you want to learn.
Common questions
Do blocks and cushions just make the exercise easier?
Not necessarily. Support takes over some of the work that is making the student tense. The focus of the exercise remains, and may become clearer.
What if a student finds their own variation?
Ask whether they feel tension anywhere. Then look at whether it keeps what you are teaching. If it does, their idea can work too.
When do you remove the support or bring the feet closer?
When the student can do the task without more effort than they can manage. It is different for each person. I do not promise a number of sessions.
Without hands-on guidance online, how can you tell whether a change helps?
Ask after each change. Invite the student to look at the screen and check their supports. Adjust the camera angle if you need to see their feet or knees.
If a student says they are tired, should they stop immediately?
For muscle fatigue, reduce the effort or take a short rest. For pain, numbness or dizziness, stop.
A final thought
That day, she did not complete thirty perfect Dolphin repetitions. But the repetitions she worked on kept the knees straight and the heels up.
Easier. Still the same lesson.
Sources and limits
The class scenes are paraphrased from a one-to-one online yoga session with Giang on 10 October 2026. They are not verbatim dialogue. The Change/Keep comparisons and the Try this question were developed for this article as teaching exercises. The class photos provide context, not proof that the student has relaxed, is safe or is doing the pose correctly. This is not a self-practice plan or a substitute for medical advice. The guidance on reducing effort and stopping follows the article on preparing for Wheel Pose.

Giang Hoang
Yoga teacher, E-RYT 500 & YACEP (Yoga Alliance)
Giang Metta Academy: RYS 200 & RYS 500 (YA ID 442630)
Based in Da Lat, Vietnam. Teaching online worldwide.